Tags
ballgown, Burnley and Trowbridge, chemisenkleid, Empire, pattern changes, puff sleeves, sleeve styles
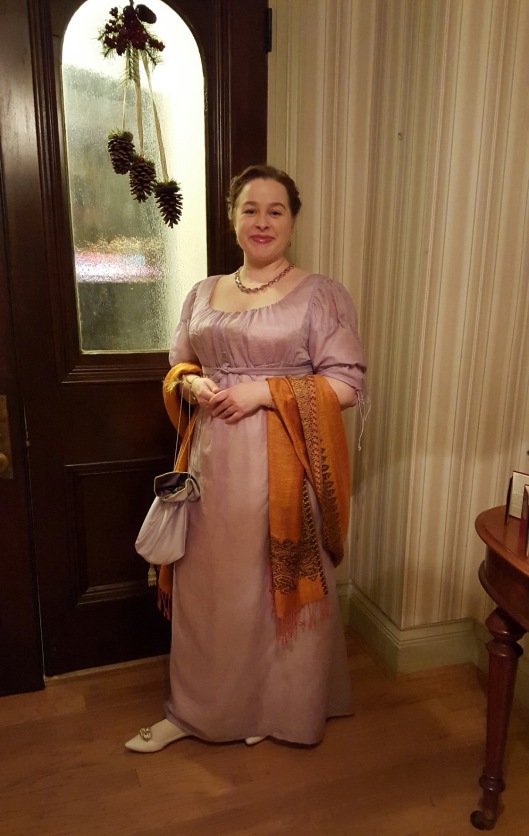
Even though I keep my Regency/Empire gowns rather simple, as they generally were early in the period, ballgowns tend to be a little more involved. Still, I use details sparingly, without any foofaraw or furbelows. No extra embellishments like embroidery or ribbon, usually. That’s just my style. This gown’s design interest is all in the sleeves, simple as they may be. Since someone may find the patterning, construction, and details interesting and useful, here’s some info.
Sleeves are usually where I put most of the detailing in my Regency gowns. Because I was emulating the German gown with three-puff sleeves …

It’s held by Munich’s Munchner Stadtmuseum and is described as a “chemiseenkleid”.
… I had to adapt my standard elbow-length, straight sleeve pattern. Basically all I did was split it in three places vertically, straight down from the armscye seam, and spread the pieces apart to add more circumference and get a full gathered effect. I could have added even more circumference to create a more gathered, slightly poofier effect, but I’m satisfied with how it turned out. Then I marked the location of two drawstring channels across the sleeves. To create the upper channels, I cut some narrow bias strips from the gown fabric and applied them to the wrong side of the sleeves with tiny hand stitches. This took some time.
Here are the sleeves early in the construction, while I was attaching the drawstring channels. There’s one channel at the sleeve head, which aligns with the upper arm, one across the bicep, and another one created by the hem.
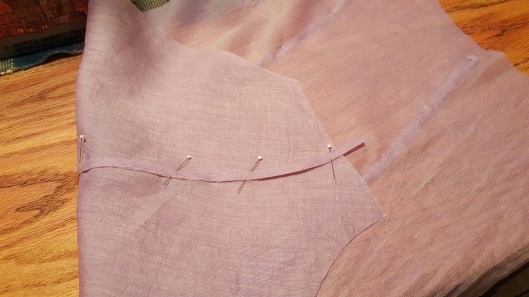
Before sewing the sleeves, I attached self-fabric bias strips to create drawstring channels. They’re on the wrong side of the sleeve, so all you see on the right side is the gathered fabric and the drawstrings tied nicely.

Tiny hand stitches hold the channels to the sleeve. You can only see pickstitches from the right side.

The drawstring channels sewn to the sleeves. The hem is turned up and pinned for sewing.
And here are the sleeves attached to the bodice.

Sleeves attached to the bodice, but the bodice is not yet attached to the skirt. You can see the three drawstrings.

The sleeve looks just like I expected it would when gathered. But this is pulled fairly tight, and my arms are full, so I can’t gather the sleeves quite so much when I wear the gown. I could have added quite a bit more fullness to get more gathering.
I got lucky with the drawstrings for the sleeve channels. Since they’re visible, I wanted them to match the gown. I found a white and beige twisted cord at the local fabric store, and decided to try dyeing it. I had a pack of dark purple RIT dye at home; the cord was polyester. Not possible, you think? Totally possible. I immersed the cord in a small dye bath, rinsed with gradually colder water, and the cord now exactly matches the fabric!

The white cord is how it came from the store. I used RIT Aubergine dye powder and managed to get exactly the same color as the muslin.
The bodice is from my standard rounded neck, gathered bodice pattern, nothing special. I adapted the Folkwear Empire gown pattern to create this bodice pattern, and this is what I now use as my Regency bodice block to create different styles.
The skirt is 3 yards of the muslin, the full width, folded in half with a single vertical seam to form a tube. One selvage becomes the waistline edge, one becomes the hem edge. The seam becomes the center-back skirt seam and is hidden in a lot of gathers. I put a 1-inch deep tuck in the skirt that aligns to the bodice side seam, and there are soft gathers across the skirt front, which helps the fabric fall gracefully over my rather round figure. (I got the idea for the skirt from a post by the Oregon Regency Society’s original blog mistress and costume maven.)
This is so not period accurate. If I was a historical reenactor, or if I wanted the bell-shaped silhouette of the later Regency, I would probably cut skirt panels as they were done in period. However, that level of accuracy is not my goal, the earlier Classical-influenced silhouette is my preference, and I’m not a masochist. Why sew seams that aren’t really necessary because of today’s wider fabrics? I choose to put my accuracy efforts into other areas. (Huzzah to anyone who does it correctly, though! My tiara is off to you!)
A side note to say that this “sheer purple muslin” fabric from Burnley & Trowbridge was a dream to work with!
Once the skirt and bodice are attached, I bind the waistline seam with a self bias strip to create a casing for the waist drawstring.

The back of the skirt is gathered tightly into the center back section of the bodice. Then the seam allowance is bound to finish it and create a drawstring casing.

The skirt front has lots of ease in it, so that when I pull up the drawstring I get gentle gathers. You can see the opening of the waist casing/channel at center front. Drawstrings are all on the interior of the gown (well, except for the sleeves).
The neckline is folded over to both finish it and create a casing for another drawstring. This is really the best way for me to make my gowns so that I can get in and out of them myself and so that they’re adjustable for weight changes. I’d hate to put so much work into these garments and then not be able to wear them if (ahem, when) I gain weight. So that’s pretty much how I make most gowns. At least those with basic drawstring neckline construction.
Once the gown was together and all seams were finished, I added a self-fabric tie belt, similar to the one that appears to finish the waist in the original gown. It’s hard to tell because the museum image is small. The belt is one piece of the gown fabric doubled, sewn, and turned right side out to form a tube with pointed ends, and pressed flat. It’s stitched to the gown waistline at center back and tacked to the side back seamlines. It wraps around to the front and ties. I could overlap the ends instead and use a brooch to keep them together, as I’ve done on another gown with the same feature.

The belt is attached to the waistline at center back and wraps around to tie in the front.
Now the biggest differences between this gown’s design and the extant gown is the lack of long sweeping train and the embroidery down the front and hem of the skirt. Maybe one day I’ll get crazy and try some simple chain-stitch embroidered motifs down the front. Maybe not. As I’ve said, I’m not really big on embellishment, but embroidered muslin gowns were a major fashion trend early in the Regency and I have wanted to try embroidery. And there are plenty of extant embroidery patterns from period ladies’ magazines that I could use.
Anyway, here are a few action shots of the gown at the Assembly at Norwich, at Teel House.
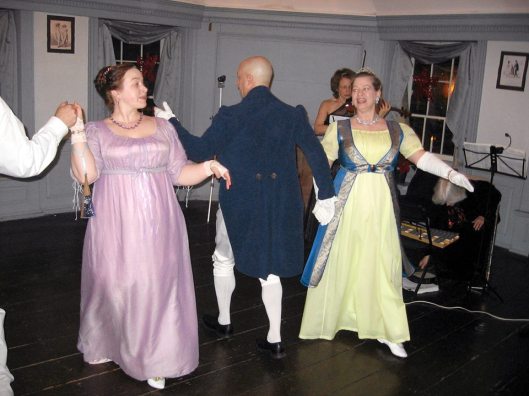
Dancing at The Assembly at Norwich, at Teel House, in my new ballgown.
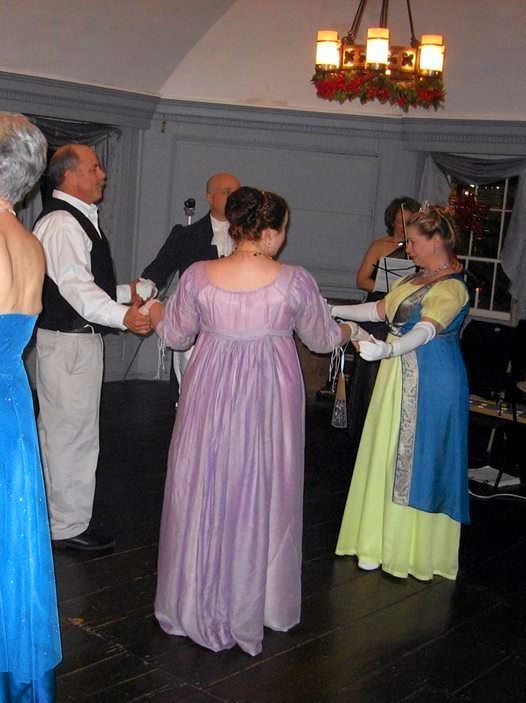
A nice full-length back view. Yeah, that hem might need to come up a bit for dancing. I kept stepping on it. You can see the belt attachment at the back. And the sleeves look pretty good here.

My friend in the white gown isn’t really giving me side-eye–we were being silly during the dance. This is a good view of the sleeves, too.
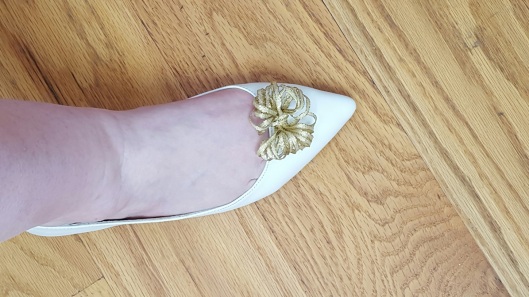
I gave my shoes some extra oomph! I used gold metallic wired ribbon to create a very simple looped ‘rosette’ and used leather glue to attach them to the shoes.
So, that’s it.